高级检索

VPPAW背面匙孔状态正面检测技术

蒋凡, 房世童, 张国凯, 陈树君, 李天明, 徐斌

蒋凡, 房世童, 张国凯, 陈树君, 李天明, 徐斌. VPPAW背面匙孔状态正面检测技术[J]. 焊接学报, 2025, 46(1): 8-14. DOI: 10.12073/j.hjxb.20231107002
引用本文: 蒋凡, 房世童, 张国凯, 陈树君, 李天明, 徐斌. VPPAW背面匙孔状态正面检测技术[J]. 焊接学报, 2025, 46(1): 8-14. DOI: 10.12073/j.hjxb.20231107002
JIANG Fan, FANG Shitong, ZHANG Guokai, CHEN Shujun, LI Tianming, XU Bin. Front-side monitoring technology for back-side keyhole state in VPPAW[J]. TRANSACTIONS OF THE CHINA WELDING INSTITUTION, 2025, 46(1): 8-14. DOI: 10.12073/j.hjxb.20231107002
Citation: JIANG Fan, FANG Shitong, ZHANG Guokai, CHEN Shujun, LI Tianming, XU Bin. Front-side monitoring technology for back-side keyhole state in VPPAW[J]. TRANSACTIONS OF THE CHINA WELDING INSTITUTION, 2025, 46(1): 8-14. DOI: 10.12073/j.hjxb.20231107002

VPPAW背面匙孔状态正面检测技术

基金项目: 国家重点研发计划项目(2023YFB 3407701)
详细信息
    作者简介:

    蒋凡,博士,教授,博士研究生导师;主要研究方向为焊接与增材制造. Email: jiangfan@bjut.edu.cn

    通讯作者:

    张国凯,博士,讲师;Email: gkzhang@bjut.edu.cn.

  • 中图分类号: TG 444

Front-side monitoring technology for back-side keyhole state in VPPAW

  • 摘要:

    变极性等离子弧焊接(variable polarity plasma arc welding, VPPAW)过程中匙孔状态,特别是背面匙孔状态是决定焊缝成形质量的核心要素. 在实际焊接过程中,背面放置传感器检测匙孔状态存在难度. 文中提出了一种基于匙孔前壁面反光的等离子弧焊接背面匙孔正面检测方法. 在合适的拍摄角度下,该方法可以同时获得正面匙孔图像和背面匙孔在前壁面的反光成像. 通过不同焊接电流下的工艺试验,建立了焊接质量与匙孔反光形态的联系. 随着焊接电流的增大,检测到的前壁面匙孔图像位置逐渐向上偏移. 焊接出现切割时,背面匙孔反光形态消失;干扰稳定焊接状态,背面匙孔反光形态同时发生改变. 匙孔稳定与否与焊接状态稳定直接关联. 背面匙孔在前壁面的反光成像状态受焊接状态和熔池状态影响. 为等离子焊接正面检测焊接质量提供了指导意义.

    Abstract:

    In the process of variable polarity plasma arc welding (VPPAW), the state of the keyhole, particularly the back-side keyhole, was a critical factor influencing the weld formation quality. However, in practical welding operations, monitoring the keyhole state from the backside with sensors presented significant challenges. Therefore, this paper proposed a method for detecting the back-side keyhole on the front view using plasma arc welding based on the reflection from the front wall of the molten pool. With appropriate shooting angles, this method could simultaneously capture both the front-side keyhole images and the reflected shape of the back-side keyhole on the front wall. The relationship between the welding quality and the reflective shape of the keyhole was established through experiments at different welding currents. With the increase of welding current, the position of the detected keyhole image on the front wall was gradually shifted upward. When the weld appeared to be cut, the reflective shape of the keyhole on the back disappeared; when the stable weld state was disturbed, the reflective shape of the keyhole on the back changed at the same time. The stability of the keyhole was directly related to the stability of the welding states. The reflective shape of the backside keyhole on the front wall was affected by the welding state and the molten pool state. This provided important guidance for establishing the correlation between the reflective shape of the keyhole on the back and the welding quality.

  • 作为先进的高能束焊接技术之一,等离子弧焊接具有能量密度高、电弧穿透能力强和焊接效率高的诸多优点. VPPAW质量高[1]、能量集中,在电弧反极性阶段还可以有效清理铝合金表面氧化膜从而获得优良的焊缝[2]. 常规等离子弧焊接易于受到实际焊接参数变化的影响,难以保证穿孔熔池的稳定性,进而影响焊缝成形质量. 焊接过程的实时检测已成为焊接质量保证中的重要手段. 其中,视觉传感以其信息丰富、适用性强特点已经在焊接领域中广泛应用. 因此,采用视觉监测系统实时监测VPPAW匙孔和熔池动态过程的变化,对于确保等离子弧焊接过程稳定运行,实现智能化、高质量等离子弧焊接具有重要的意义.

    在等离子穿孔焊接过程中,观察匙孔和熔池最直接的方法是在焊接正面和背面各自架设一台相机. 采用此方法来观察正面熔池和背面匙孔,来检测焊接质量的变化[3-8]. 此外,在焊接正面架设相机,配合光路传感的设计对焊接正面和背面进行同步检测.设计光路视觉传感系统同时获取工件的正背面焊缝图像,继而实时监控焊接过程的状态变化[9]. 对于VPPAW,通过在焊接平台的上方架设一台相机,工件的前方和后方放置反光镜,利用相机与反光镜形成的双光路视觉传感系统同时获取正面熔池和背面匙孔图像来检测焊接质量的变化[10].

    对于穿孔型等离子弧焊接的视觉检测方法,多数研究通过在正背面架设相机和设计光路视觉传感系统来同时获取正面熔池和背面匙孔图像. 设计方案和检测设备均比较复杂. 文中提出了一种方法,在工件正面架设相机,通过匙孔前壁面反射获取背面匙孔状态. 基于正面熔池和背面匙孔反光形态实现对焊接状态和焊接质量的判断.

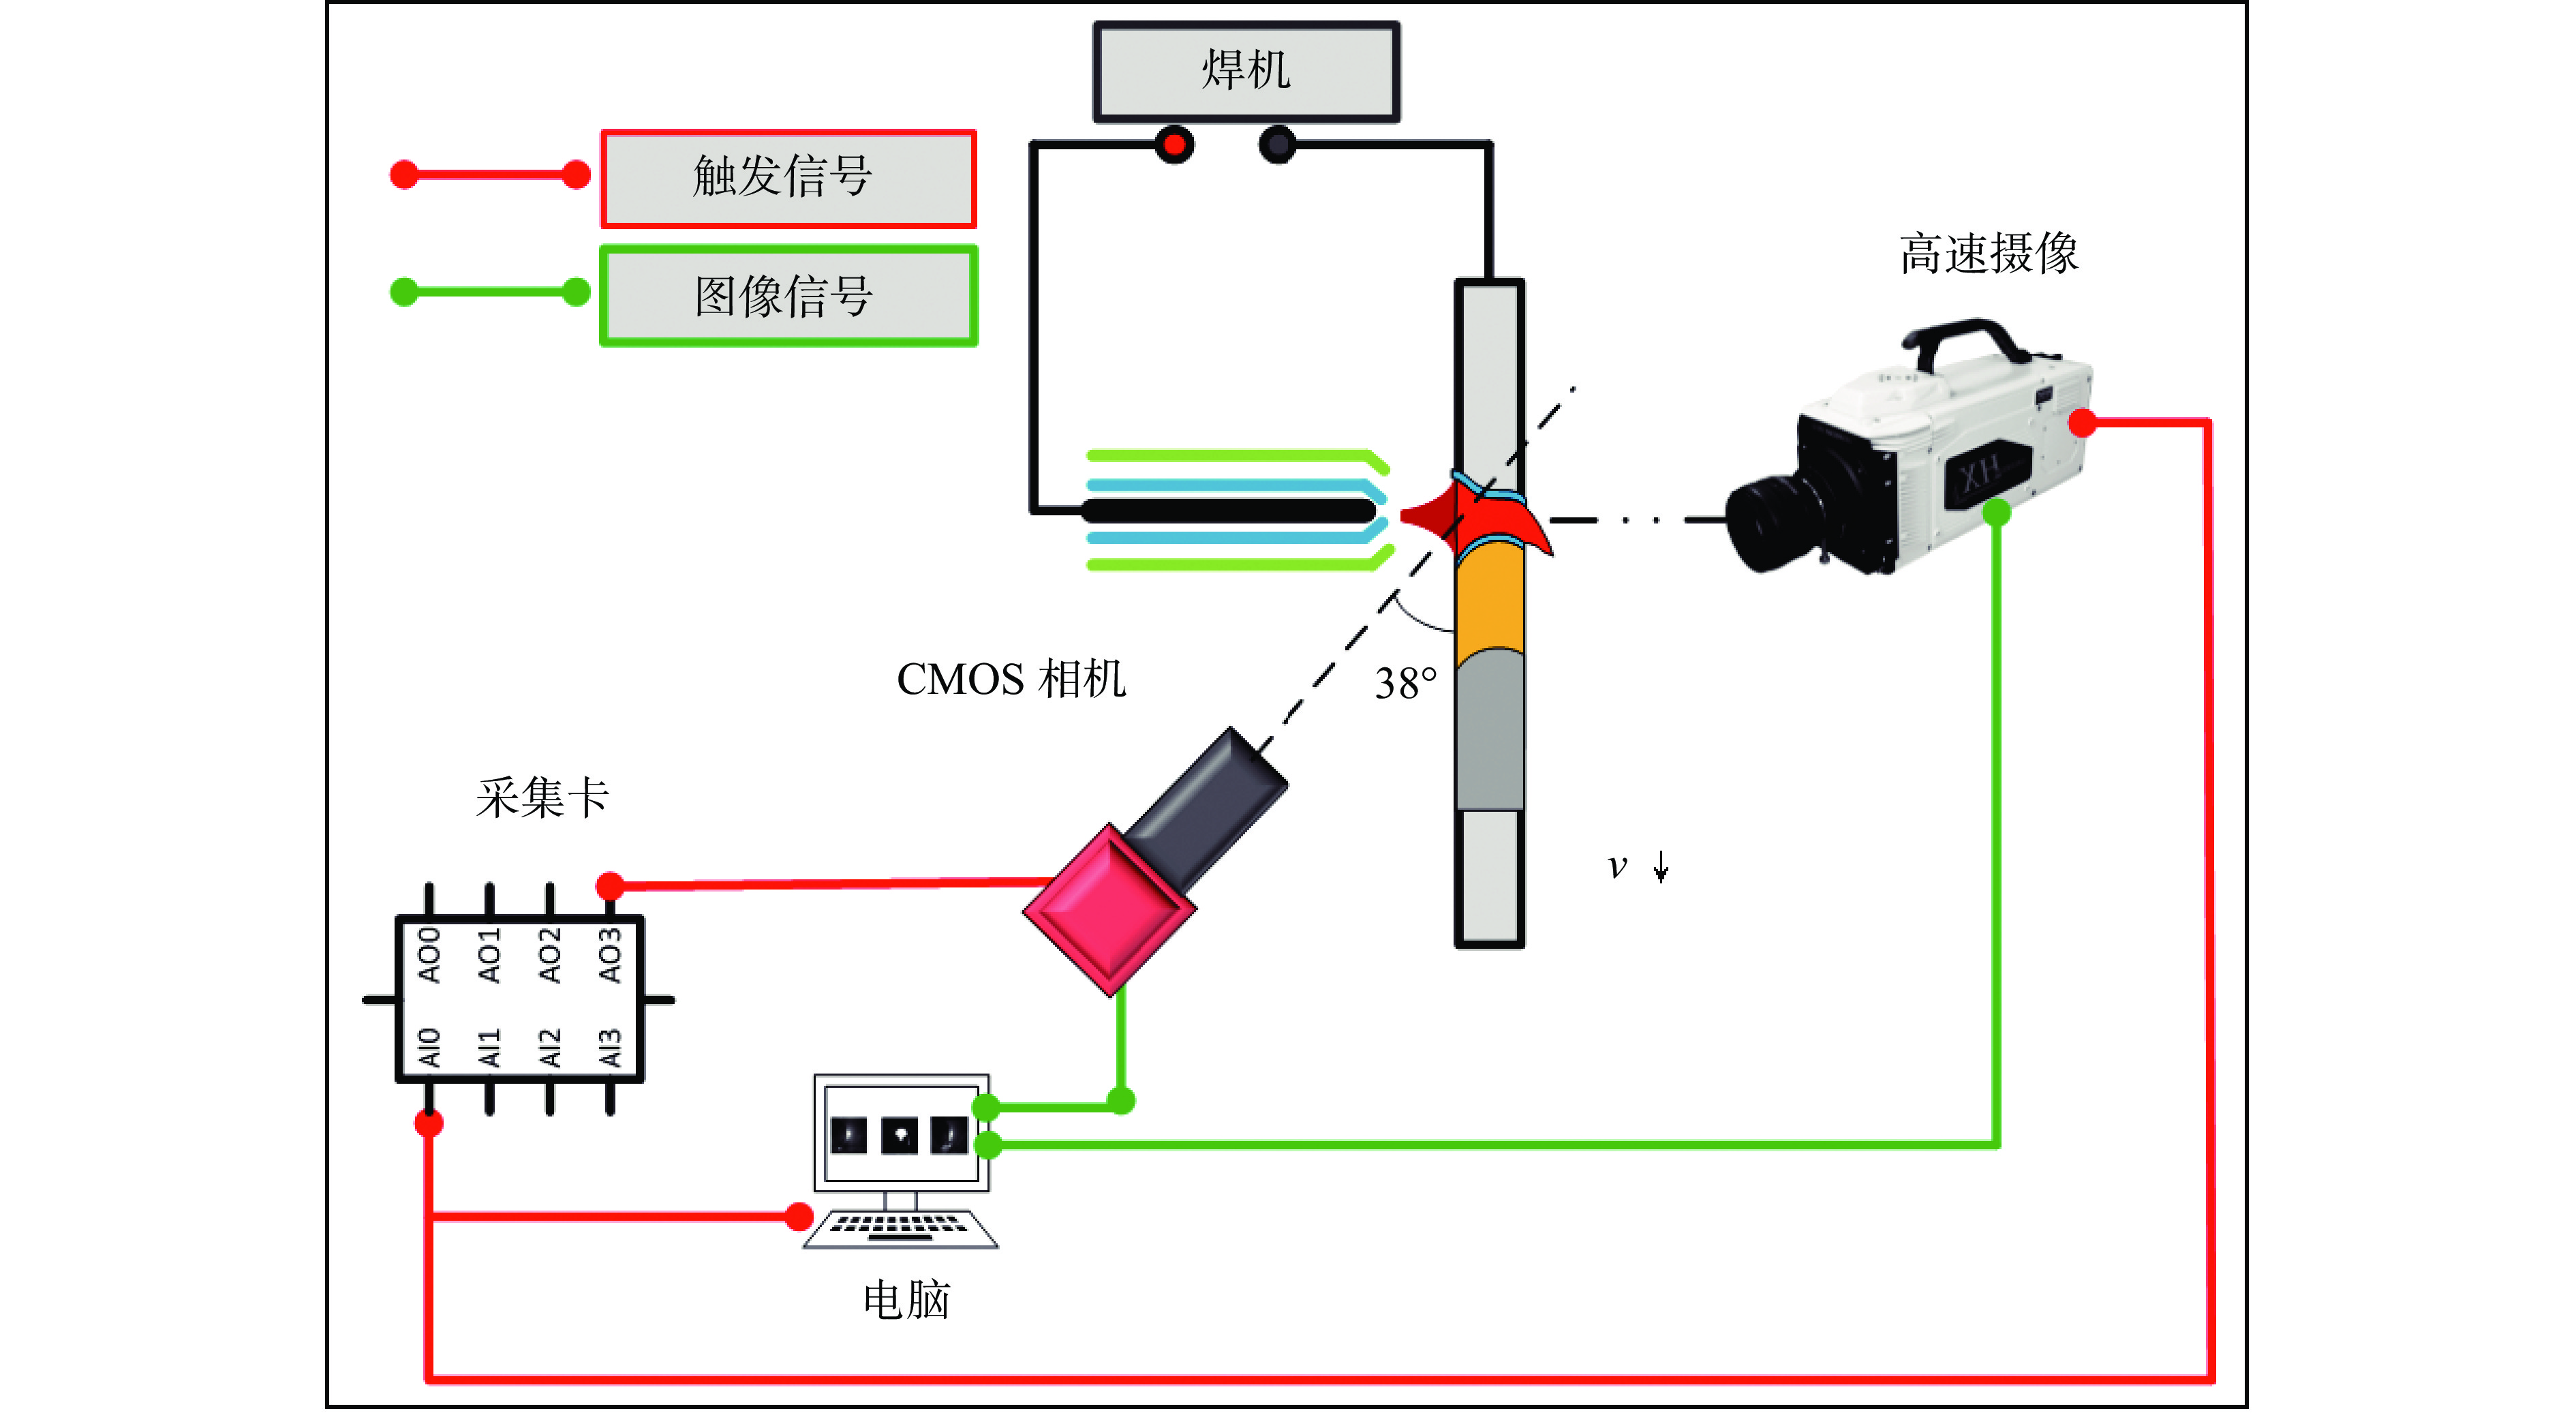
    整体试验系统,如图1所示. 试验系统主要包括焊接系统和图像采集系统. 焊接系统主要由VPPAW电源、送丝机、焊枪、水箱和气瓶组成. 图像信号采集系统主要由COMS相机、中心波长为520 nm的窄带滤光片、HX3E高速摄像机和40 W激光器组成. 试验中针对匙孔壁面,采用OLYMPUS LEXT OLS4000激光共聚焦显微镜进行焊后拍摄.

    图  1  系统整体示意图
    Figure  1.  Schematic diagram of the overall system

    CMOS相机置于工件前侧观测正面熔池图像和前壁面匙孔反光图像. 相机与工件的夹角为38°,配备减光片以减少等离子弧的干扰. 高速摄像机置于工件背面采集背面匙孔图像,背面匙孔采集采用532 nm的40 W激光作为照明光源. 工件的行走速度通过控制系统来进行控制. 正面CMOS相机与背面高速摄像机在控制信号作用下同时触发,确保了图像采集同步性和时序对应. CMOS相机的采集频率为250帧/s,高速摄像的采集频率为1000帧/s. CMOS相机和高速摄像采集的图像均设置为256像素 × 256像素. 在焊接过程中,焊枪保持不动,工件以150 mm/min的速度向下匀速运动.

    在等离子焊接中,焊接电流和离子气流量是决定焊接质量的重要工艺参数. 为简化分析,文中离子气流量选用固定值,通过控制单一变量焊接电流改变焊接状态,观测拍摄匙孔的变化.工件为5020铝合金,保护气流量为15 L/min,工件厚度为5 mm,离子气流量为3.5 L/min,焊丝为5183焊丝,送丝速度为120 mm/min,焊丝直径为1.2 mm,EN阶段和EP阶段时间分别为21 ms和4 ms. 其他焊接工艺参数,如表1所示.

    表  1  焊接试验参数
    Table  1.  Paraments of welding experiment
    组别 EN电流
    I1/A
    EP电流
    I2/A
    成形状态
    1 120 150 正常
    2 130 160 正常
    3 140 170 正常
    4 150 180 正常
    5 160 190 正常
    6 170 200 成形不良
    7 150 180 成形不良—切割
    8 150 180 正常—干扰
    9 150 180 正常—切割
    下载: 导出CSV 
    | 显示表格

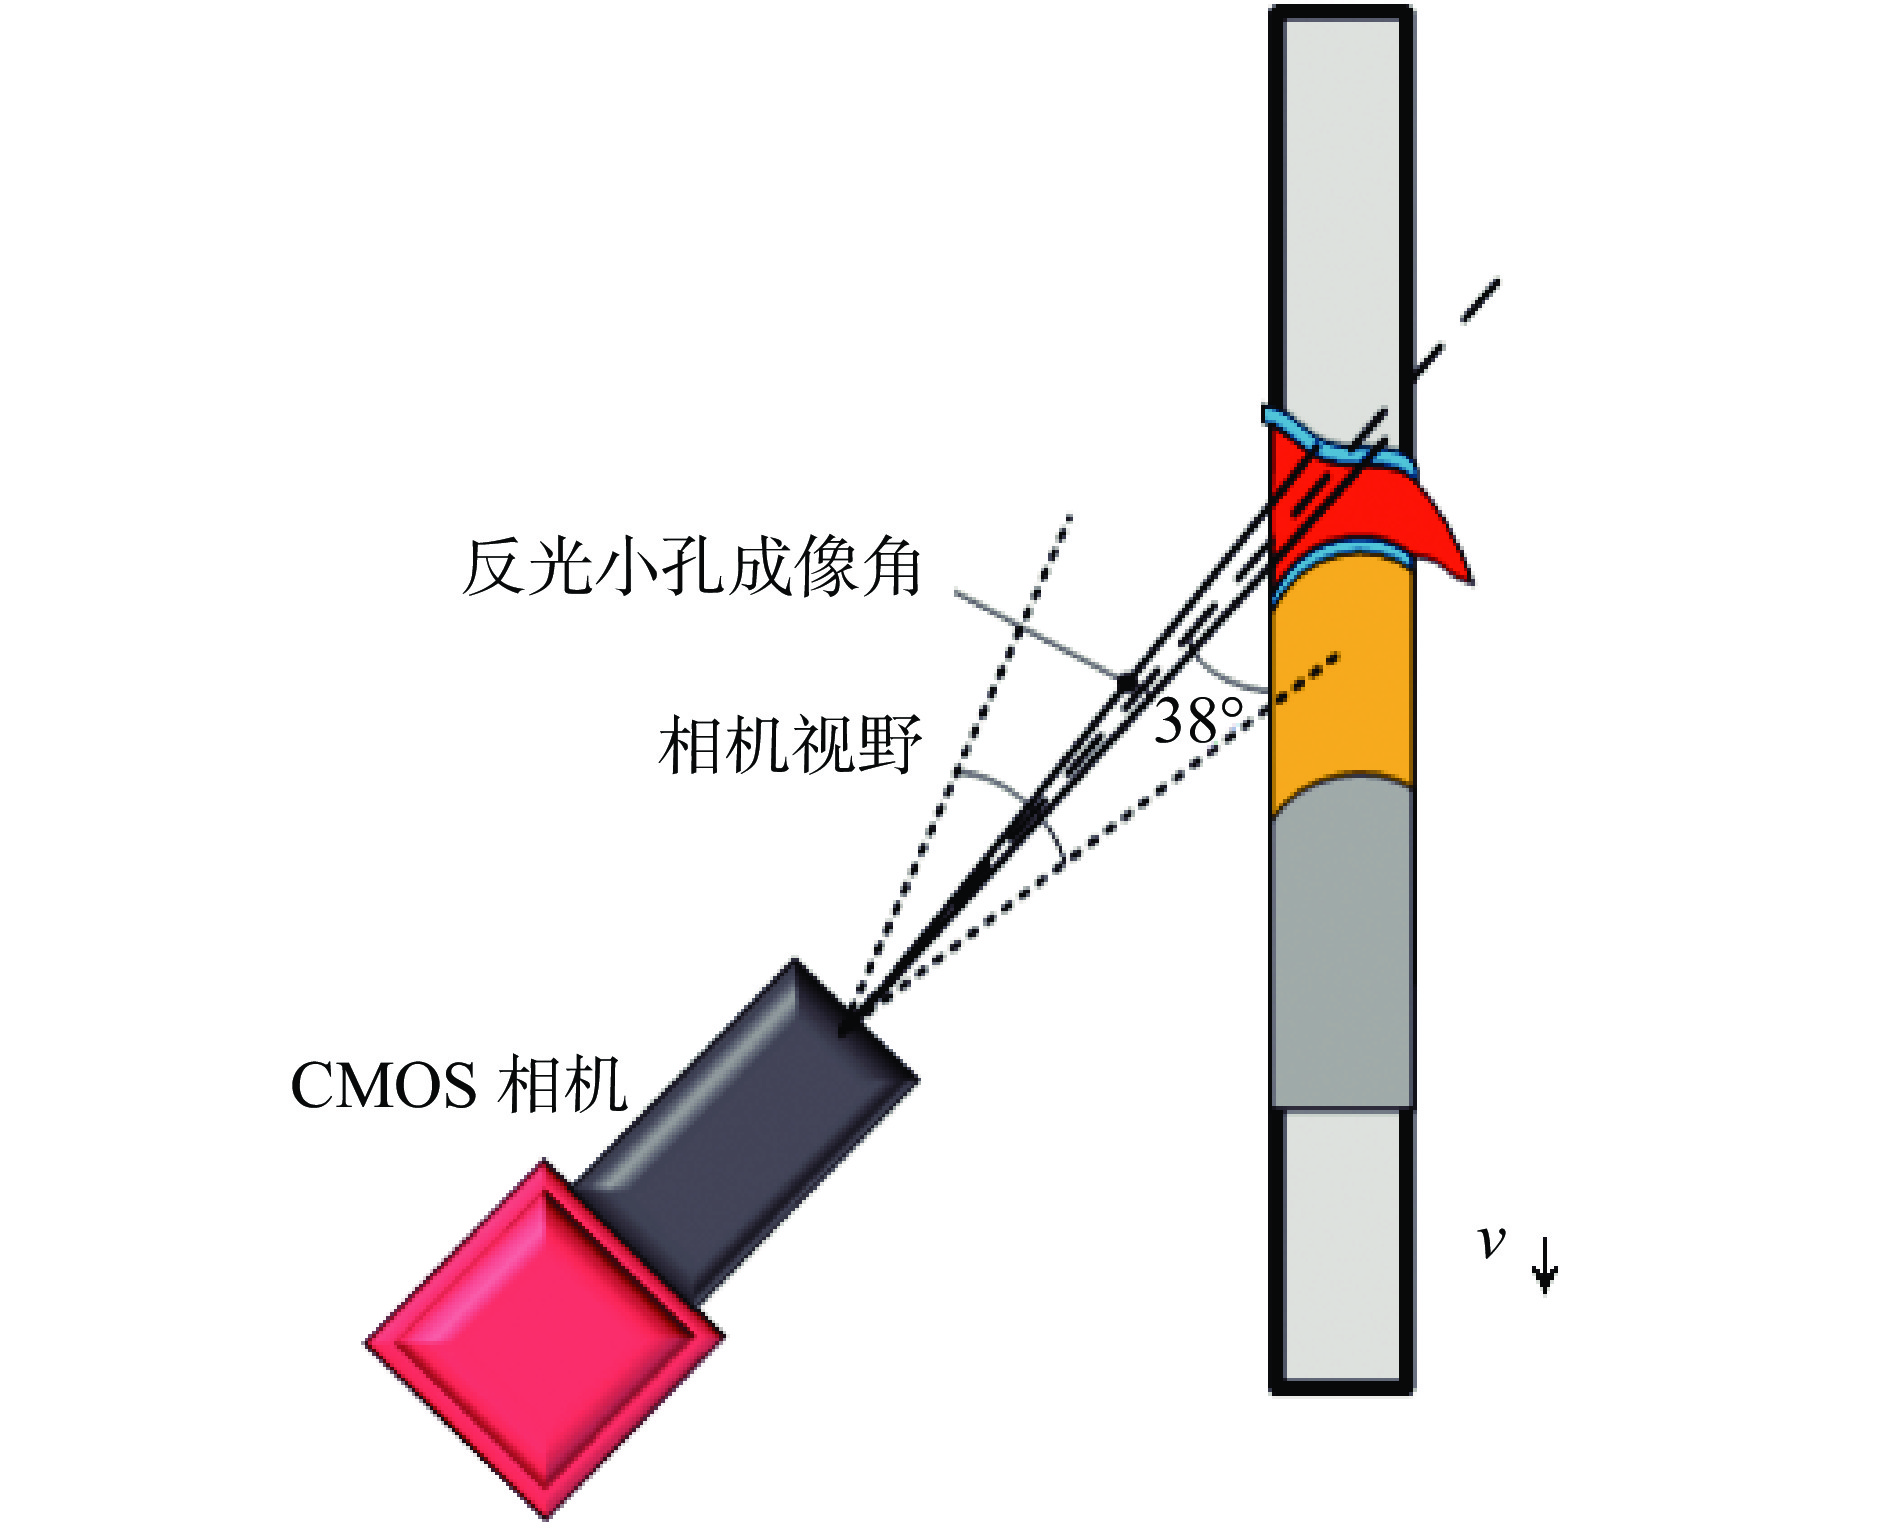
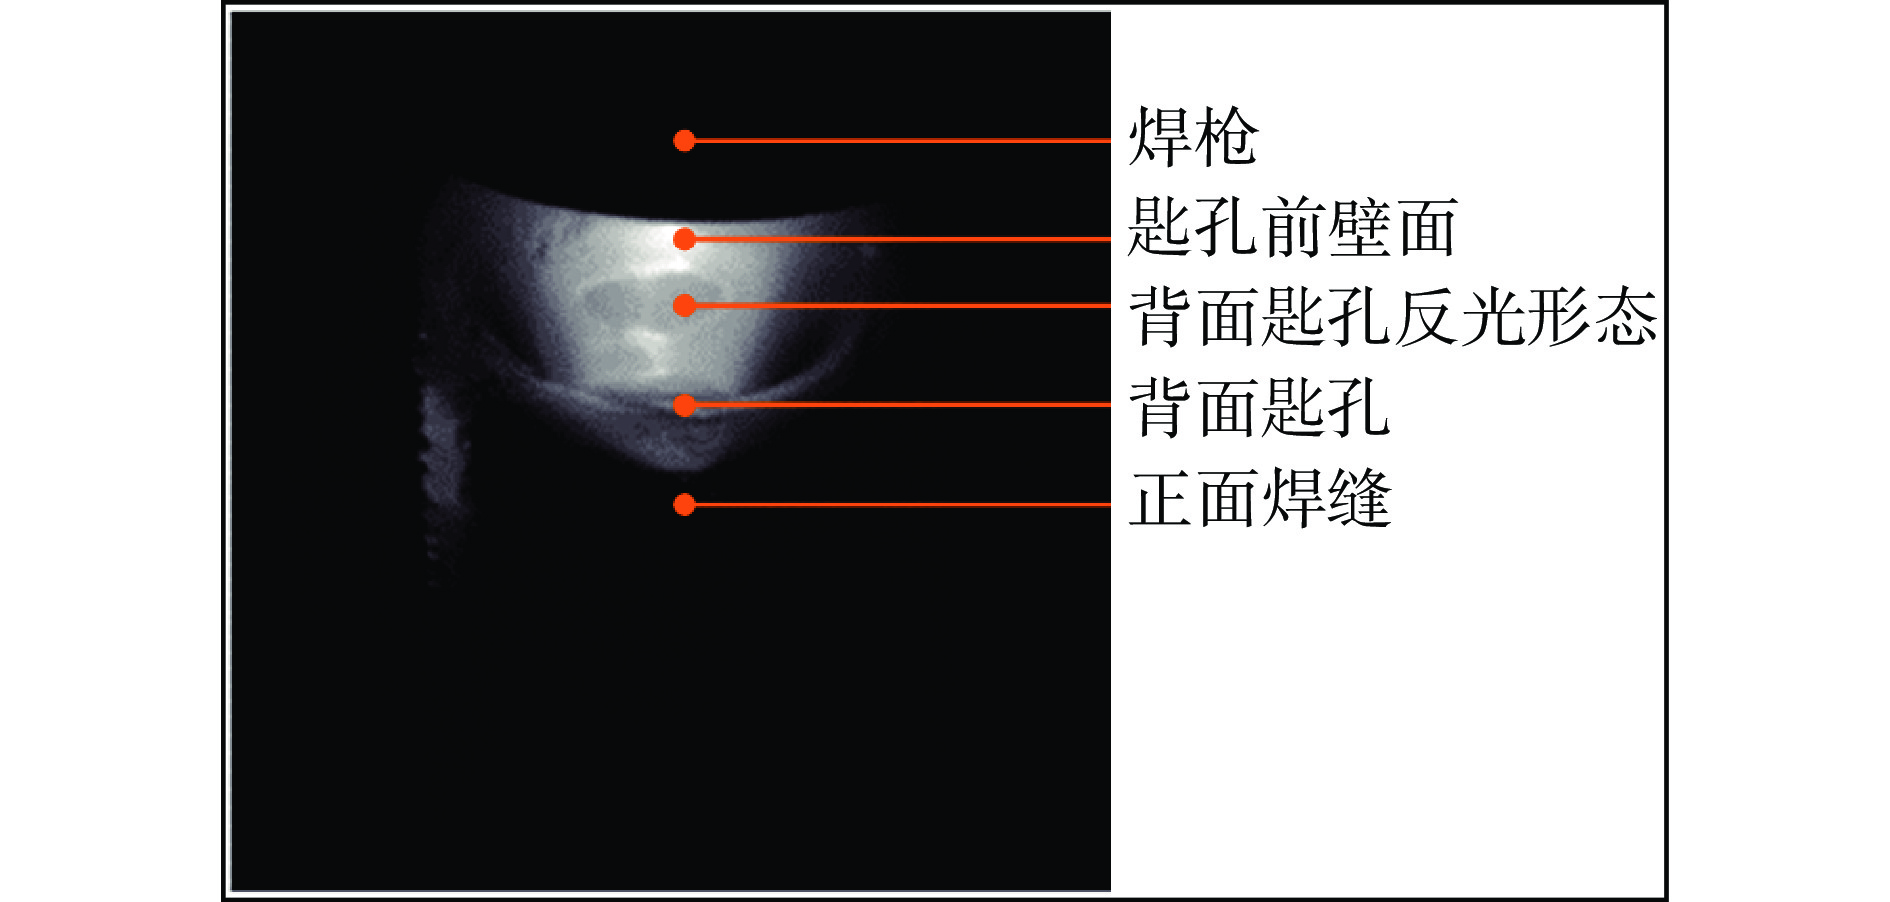
    正面相机拍摄角度和熔池相对位置关系,如图2所示. 在该角度下,相机可以拍摄到等离子焊接匙孔前壁面. 匙孔壁面为液态金属,具有非常好的反光特性. 因此,在固定板材厚度下,通过调节拍摄角度可以获取壁面对匙孔内部的反光图像. 图2中反光匙孔成像角为正面相机中拍摄到背面匙孔反光形态最上方和最下方的角度范围. 针对厚度为5 mm的板材,文中选择拍摄角度为38°,获取的表1中第4组工艺参数下的正面相机拍摄穿孔熔池图像成像,如图3所示. 图3中包括焊枪、匙孔前壁面、背面匙孔反光形态、背面匙孔和正面焊缝.

    图  2  正面相机成像示意图
    Figure  2.  Schematic diagram of front-side camera imaging
    图  3  正面相机图像成像
    Figure  3.  Front-side camera imaging

    为解释图3中的背面匙孔反光形态,对正面相机的成像光路进行逆向展开. 首先还原焊接过程中的匙孔形态,在焊接时采取急停断电获取焊接熔池形貌. 用激光共聚焦显微镜拍摄还原真实匙孔形态,如图4所示. 为简化分析,选取图4中匙孔中央界面分析.

    图  4  匙孔三维立体还原
    Figure  4.  3D reconstruction of keyhole

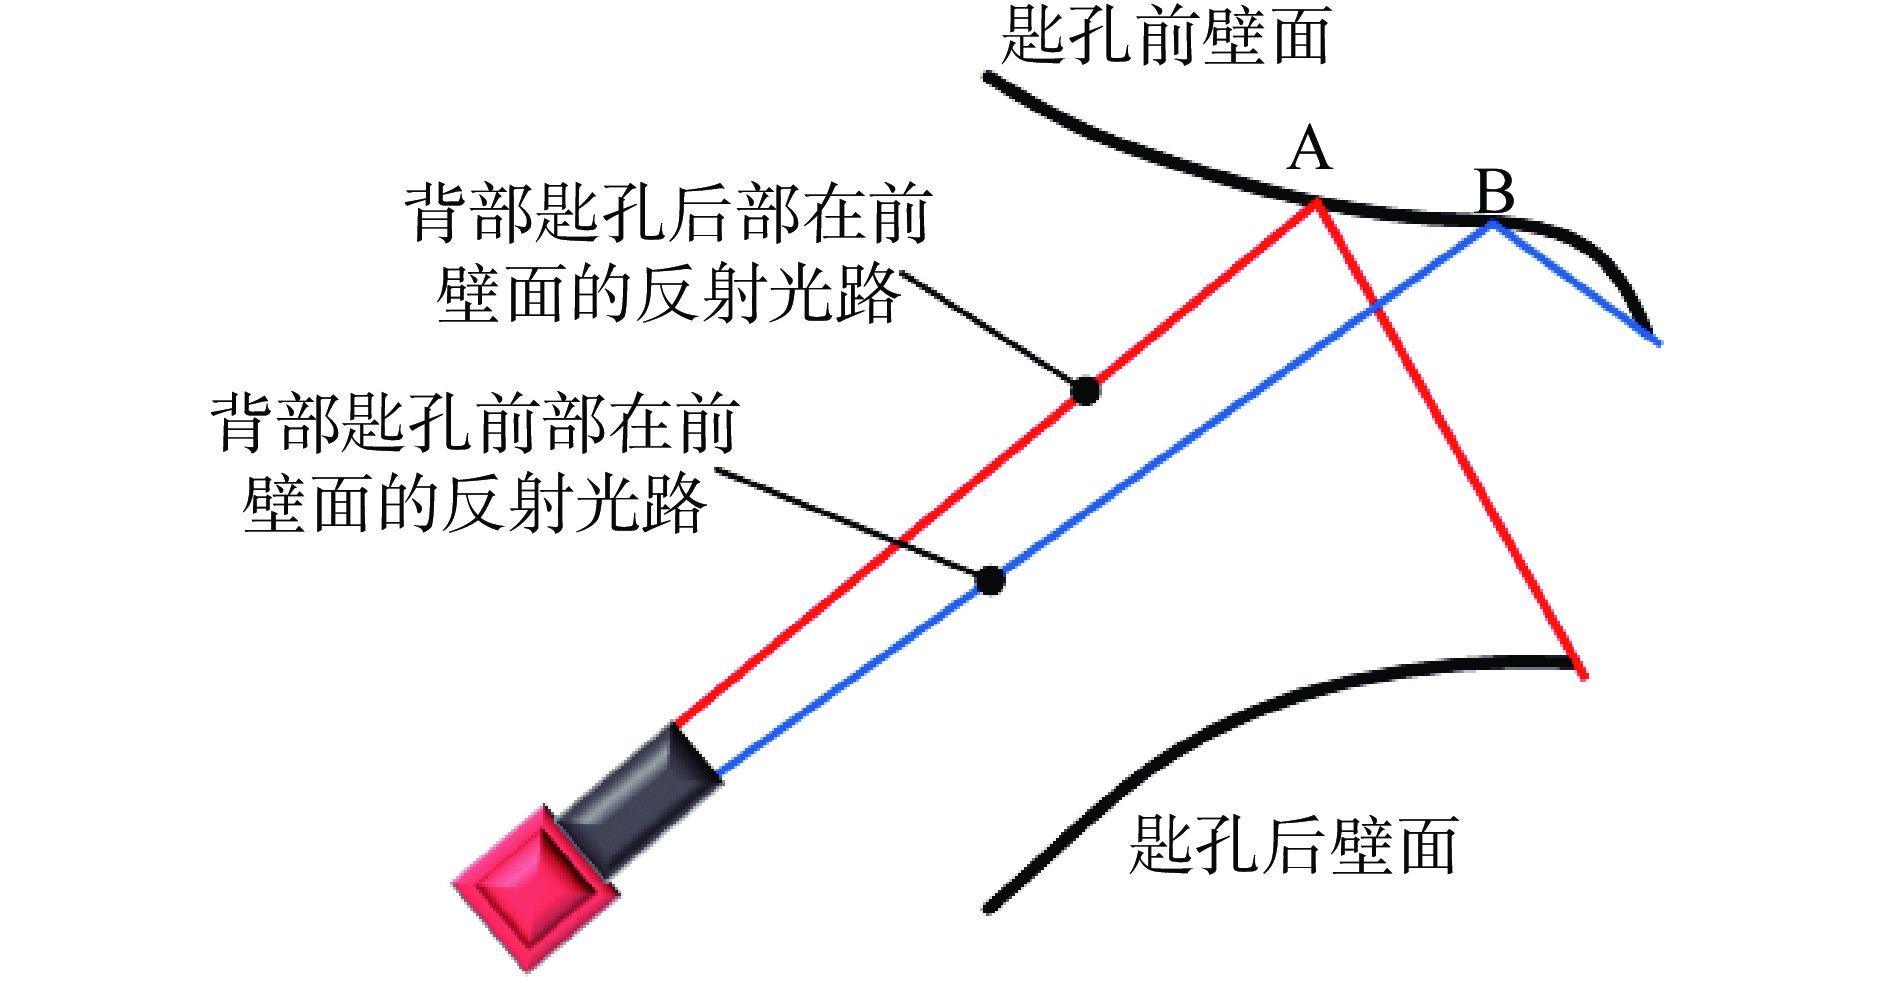
    在等离子弧的作用下,焊接过程中匙孔中央界面前后壁面线条,如图5所示. 运用光学仿真平台模拟相机成像光路,背部匙孔后部和前部在前壁面的反射光路,如图5所示. 图中A点与B点之间即为背部匙孔反光成像所在位置,而沿A点到B点反光到熔池背面的位置为背面穿孔位置. 将模拟截面拓展至整个熔池,可确认前壁面椭圆图像为背面匙孔在穿孔熔池壁面上的反光.

    图  5  正面相机成像原理示意图
    Figure  5.  Schematic diagram of front-side camera imaging principle

    文中开展了不同焊接电流下的焊接试验并拍摄正面相机中的背面匙孔反光形态和背面相机的匙孔图像. EN阶段焊接电流为120,130,140,150,160 A和170 A. 在以上试验条件下正背面相机拍摄到的图像,如图6所示. 在120 ~ 160 A焊接电流下,焊接质量较好,正面相机均拍摄到背面匙孔在前壁面稳定的反光成像. 但不同焊接电流下反光成像所在的位置发生了改变. 在170 A的焊接电流下,焊缝成形不良,背面匙孔反光形态较差. 为了进一步分析正常焊接情况下背面匙孔的反光成像规律,运用感兴趣区域裁剪放大了图6中焊接电流为120 ~ 160 A的匙孔正背面相机成像以便进一步观察,如图7所示.

    图  6  正常焊接情况下匙孔图像正背面相机成像
    Figure  6.  Front and back camera imaging of keyhole images under normal welding conditions
    图  7  正常焊接状态的匙孔正背面相机成像
    Figure  7.  Front and back camera imaging of keyhole in normal welding state

    图7可以看出,随着电流的增大,正面相机中背面匙孔反光形态的下方沿匙孔前壁面上移. 背面相机中匙孔前壁面中央位置随着电流的增大而向上方移动. 背面相机中匙孔后壁面中央位置和正面相机中背面匙孔反光形态的上方没有随着电流的增大而移动.

    为了进一步探寻正常焊接时背面匙孔反光位置随着电流的增大而沿着前壁面上移的原因,对正常焊接情况下电流为120 ~ 160 A的试验,采取焊接时急停断电的操作以保持焊接状态时的匙孔形貌,急停断电后的匙孔前后壁面成像,如图8所示. 并且将匙孔前后壁面切割分开,如图8(a)所示. 由图7可知,匙孔后壁面不随电流增大而移动,因此保证匙孔切开面到匙孔后壁面的距离相同,可以分析不同电流下匙孔前壁面的差异. 采用激光共聚焦显微镜对不同电流下的匙孔前壁面进行扫描,如图8(b)所示.

    图  8  急停断电后的匙孔前后壁面成像
    Figure  8.  Imaging of front and rear walls of the keyhole after emergency shutdown and power outage. (a) front view of keyhole; (b) top view of the front wall of keyhole

    利用激光共聚焦软件的测量功能输出匙孔前壁面中间位置处1-2的激光反射强度值,来反映中间位置处前壁面曲线的变化,正常焊接状态匙孔中心前壁面曲线,如图9所示. 不同焊接电流下前壁面的曲线形状不一致. 原因为焊接电流参数会影响匙孔前壁的熔化速度,因而改变匙孔前壁弯曲形态[11-12]. 图9中星形符号标记出不同电流下匙孔相对位置. 随着电流的增大而沿前壁面前移,这也是正面相机图像中背面匙孔反光沿前壁面上移的原因.

    图  9  正常焊接状态匙孔中心前壁面曲线
    Figure  9.  Curves of the front wall of the center of the small hole in the normal welding state

    文中所研究的扰动情况主要包括3种情况,第1种情况为在不可控扰动作用下,焊接质量表现出不稳定性,导致成形不良并最终出现切割现象;第2种情况为在正常焊接过程中,由于人为因素对熔池稳定性的干扰,进而造成切割现象;第3种情况为在正常焊接时,突然停丝导致切割的现象. 在第1种情况下的焊接过程中,正背面相机拍摄的图像,如图10所示. 以拍摄时间当作相对时间t = 0 s. 从t = 0 s到t = 0.13 s,当焊缝成形不良情况发生时,正面相机拍摄到的背面匙孔的反光形态不能稳定保持. 从t = 0.13 s到t = 3.25 s,背面匙孔下方一侧逐渐被拉长,然后焊缝出现切割的现象,对应的正面相机拍摄的反光现象消失.

    图  10  从成形不良到切割焊接情况下正背面相机成像
    Figure  10.  Imaging of front and back cameras from poor forming to cutting and welding conditions

    在第2种情况下的焊接过程中,正背面相机拍摄的图像,如图11所示. 以拍摄时间作为相对时间t = 0 s,人为干扰匙孔前,正面相机中的背面匙孔反光形态稳定存在. 当t = 1.52 s时,在人为干扰瞬间,背面匙孔被破坏,正面相机中的背面匙孔反光形态同样发生变化. 从t = 2.12 s到t = 2.96 s,背面匙孔下方逐渐拉长,不能正常闭合,对应正面相机的反光不能稳定保持. 1 s后焊缝出现切割,背面匙孔反光形态消失.

    图  11  从正常到人为干扰情况下正背面相机成像
    Figure  11.  Imaging of front and back cameras from normal to human interference conditions

    在第3种情况下的焊接过程中,正背面相机拍摄图像,如图12所示. 停丝瞬间拍摄时间作为相对时间t = 0 s,正面相机中的背面匙孔反光形态稳定存在. 从t = 3.49 s到t = 9.31 s,由于停丝的缘故,熔融金属只能由基板提供,匙孔后壁面不能正常闭合,出现尖角状,此时对应正面相机拍摄的背面匙孔反光形态的上方同时出现了向上的突起. 直至t = 12.18 s焊缝出现切割时,背面匙孔反光形态消失.

    图  12  从正常到不送丝情况下正背面相机成像
    Figure  12.  Imaging of front and back cameras from normal to no wire feeding

    (1)提出一种背面匙孔状态正面检测方法,在特定板材厚度下选用特定角度,利用正面相机拍摄匙孔前壁面反射获得背面匙孔形态.

    (2)背面匙孔反光成像位置在匙孔前壁面,前壁面随着焊接电流的增大向前移,背面匙孔在前壁面的反光随焊接电流增大而上移.

    (3)只有当背面匙孔和熔池状态都稳定保持时,才能通过壁面反光观测到背面匙孔. 匙孔前壁面反射出的背面匙孔形态与焊接状态具有相关性.

  • 图  1   系统整体示意图

    Figure  1.   Schematic diagram of the overall system

    图  2   正面相机成像示意图

    Figure  2.   Schematic diagram of front-side camera imaging

    图  3   正面相机图像成像

    Figure  3.   Front-side camera imaging

    图  4   匙孔三维立体还原

    Figure  4.   3D reconstruction of keyhole

    图  5   正面相机成像原理示意图

    Figure  5.   Schematic diagram of front-side camera imaging principle

    图  6   正常焊接情况下匙孔图像正背面相机成像

    Figure  6.   Front and back camera imaging of keyhole images under normal welding conditions

    图  7   正常焊接状态的匙孔正背面相机成像

    Figure  7.   Front and back camera imaging of keyhole in normal welding state

    图  8   急停断电后的匙孔前后壁面成像

    Figure  8.   Imaging of front and rear walls of the keyhole after emergency shutdown and power outage. (a) front view of keyhole; (b) top view of the front wall of keyhole

    图  9   正常焊接状态匙孔中心前壁面曲线

    Figure  9.   Curves of the front wall of the center of the small hole in the normal welding state

    图  10   从成形不良到切割焊接情况下正背面相机成像

    Figure  10.   Imaging of front and back cameras from poor forming to cutting and welding conditions

    图  11   从正常到人为干扰情况下正背面相机成像

    Figure  11.   Imaging of front and back cameras from normal to human interference conditions

    图  12   从正常到不送丝情况下正背面相机成像

    Figure  12.   Imaging of front and back cameras from normal to no wire feeding

    表  1   焊接试验参数

    Table  1   Paraments of welding experiment

    组别 EN电流
    I1/A
    EP电流
    I2/A
    成形状态
    1 120 150 正常
    2 130 160 正常
    3 140 170 正常
    4 150 180 正常
    5 160 190 正常
    6 170 200 成形不良
    7 150 180 成形不良—切割
    8 150 180 正常—干扰
    9 150 180 正常—切割
    下载: 导出CSV
  • [1] 王小伟, 张斌, 曾如川, 等. 铝合金VPPAW穿孔焊接匙孔闭合处的微观组织与力学性能[J]. 焊接学报, 2024, 45(3): 1 − 6. doi: 10.12073/j.hjxb.20230402001

    Wang Xiaowei, Zhang Bin, Zeng Ruchuan, et al. Microstructure and mechanical properties of welds at keyhole closures in variable-polarity plasma arc welding of Al alloy[J]. Transactions of the China Welding Institution, 2024, 45(3): 1 − 6. doi: 10.12073/j.hjxb.20230402001

    [2] 韩蛟, 韩永全, 洪海涛, 等. 基于光谱诊断的VPPA-MIG复合电弧耦合机理分析[J]. 焊接学报, 2023, 44(11): 104 − 109. doi: 10.12073/j.hjxb.20221211001

    Han Jiao, Han Yongquan, Hong Haitao, et al. Analysis of VPPA-MIG hybrid arc coupling mechanism based on spectral diagnosis[J]. Transactions of the China Welding Institution, 2023, 44(11): 104 − 109. doi: 10.12073/j.hjxb.20221211001

    [3]

    Jiao W H, Wang Q Y, Cheng Y C, et al. End-to-end prediction of weld penetration: a deep learning and transfer learning based method[J]. Journal of Manufacturing Processes, 2021, 63: 191 − 197. doi: 10.1016/j.jmapro.2020.01.044

    [4]

    Zhou F Z, Liu X F, Zhang X F, et al. Keyhole status prediction based on voting ensemble convolutional neural networks and visualization by grad-CAM in PAW[J]. Journal of Manufacturing Processes, 2022, 80: 805 − 815. doi: 10.1016/j.jmapro.2022.06.034

    [5]

    Nomura K, Fukushima K, Matsumura T, et al. Burn-through prediction and weld depth estimation by deep learning model monitoring the molten pool in gas metal arc welding with gap fluctuation[J]. Journal of Manufacturing Processes, 2021, 61: 590 − 600. doi: 10.1016/j.jmapro.2020.10.019

    [6] 陈宸, 周方正, 李成龙, 等. 融合空间和通道特征的等离子弧焊熔池熔透状态预测方法[J]. 焊接学报, 2023, 44(4): 30 − 38. doi: 10.12073/j.hjxb.20220516001

    Chen Chen, Zhou Fangzheng, Li Chenglong, et al. Prediction method of plasma arc welding molten pool melting state based on spatial and channel characteristics[J]. Transactions of the China Welding Institution, 2023, 44(4): 30 − 38. doi: 10.12073/j.hjxb.20220516001

    [7]

    Kim H, Nam K, Oh S, et al. Deep-learning-based real-time monitoring of full-penetration laser keyhole welding by using the synchronized coaxial observation method[J]. Journal of Manufacturing Processes, 2021, 68: 1018 − 1030. doi: 10.1016/j.jmapro.2021.06.029

    [8]

    Kim H, Nam K, Kim Y, et al. Analysis of laser-beam absorptance and keyhole behavior during laser keyhole welding of aluminum alloy using a deep-learning-based monitoring system[J]. Journal of Manufacturing Processes, 2022, 80: 75 − 86. doi: 10.1016/j.jmapro.2022.05.044

    [9] 樊重建. 变间隙铝合金脉冲GTAW熔池视觉特征获取及其智能控制研究[D]. 上海: 上海交通大学, 2008.

    Fan Chongjian. Weld pool characters extraction visual sensing and intelligent control during varied gap aluminum alloy pulsed GTAW process[D] Shanghai: Shanghai Jiao Tong University, 2008.

    [10] 吴頔. 基于多源信息融合的铝合金VPPAW成形预测和智能控制研究[D]. 上海: 上海交通大学, 2018.

    Wu Di. Research on predicting and intelligent control for weld formation during VPPAW process using multi-information fusion[D] Shanghai: Shanghai Jiao Tong University, 2018.

    [11]

    Liu Z M, Wu C S, Cui S L, et al. Correlation of keyhole exit deviation distance and weld pool thermo-state in plasma arc welding process[J]. International Journal of Heat and Mass Transfer, 2017, 104: 310 − 317. doi: 10.1016/j.ijheatmasstransfer.2016.08.069

    [12]

    Liu Z M, Wu C S, Chen M A. Experimental sensing of the keyhole exit deviation from the torch axis in plasma arc welding[J]. The International Journal of Advanced Manufacturing Technology, 2014, 71(3): 1209 − 1219.

图(12)  /  表(1)
计量
  • 文章访问数:  95
  • HTML全文浏览量:  13
  • PDF下载量:  35
  • 被引次数: 0
出版历程
  • 收稿日期:  2023-11-06
  • 网络出版日期:  2024-12-29
  • 刊出日期:  2025-01-24

目录

/

返回文章
返回